自定义 Kubernetes 准入控制器
1. 理论概要
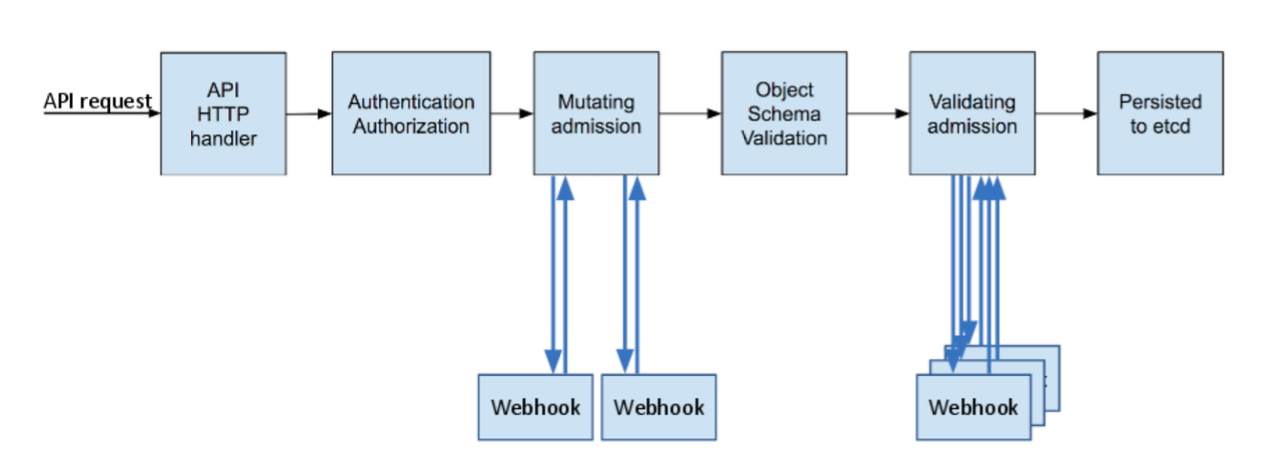
除了 Kubernetes 默认的 admission controller,我们可以使用 admission webhooks 作为准入链的一部分。admission webhooks 调用 webhook 服务以在 pod 创建时变更配置,如注入标签,或者在准入过程中验证 pod 配置。下图为准入控制器流程:

Admission webhooks 有两种类型:
Mutating admission webhooks用于在资源存储之前通过 mutating webhooks 进行修改Validating admission webhooks用于在资源存储之前通过 validating webhooks 自定义策略验证资源
当 API 请求进入时,mutating 和 validating 控制器使用配置中的外部 webhooks 列表并发调用,规则如下:
- 如果所有的 webhooks 批准请求,准入控制链继续流转
- 如果有任意一个 webhooks 阻止请求,那么准入控制请求终止,并返回第一个 webhook 阻止的原因。其中,多个 webhooks 阻止也只会返回第一个 webhook 阻止的原因
- 如果在调用 webhook 过程中发生错误,那么请求会被终止或者忽略 webhook
准入控制器和 webhook 服务器之间通信需要使用 TLS 进行安全保护,因此要针对相应的 webhook 服务器生成 TLS 证书,这个后面会介绍具体流程。
Admission webhooks 可以使用如下几个场景:
- 通过 mutating webhook 注入 side-car 到 Pod(istio 的 side-car 就是采用这种方式注入的)
- 限制项目使用某个资源(如限制用户创建的 Pod 使用超过限制的资源等)
- 自定义资源的字段复杂验证(如 CRD 资源相关字段的规则验证等)
2. 场景说明
本文通过一个较为实用的场景来自定义编写 admission webhooks,使用 Kubernetes 的过程中可能遇到过 DNS 5s 延迟的问题,产生问题的原因可以具体参考官方 issue DNS intermittent delays of 5s 。这里我们通过编写 admission mutating webhook 注入 DNS 配置,以达到解决问题的目的。因为我们是针对 Pod 资源的 admission webhook,对于 CRD 的资源我们可以使用 kubebuilder 来生成脚手架。但是对于 core 类型的资源如 Pod,kubebuilder 并不支持,我们需要直接使用 controller-runtime 编写,官方提供了内建资源 webhook 的示例 controller-runtime/examples/builtins/ (CRD 资源建议参考 kubebuilder webhook)。validating 和 mutating webhook 类似,这里我们以 mutating webhook 为例。
3. 代码实现
首先构建 main 函数,main 主要是构建 manager 然后创建 webhooks 并注册 API:
package main

import (
        "flag"
        "os"

        "github.com/spf13/pflag"
        "k8s.io/apimachinery/pkg/runtime"
        "sigs.k8s.io/controller-runtime/pkg/client/config"
        logf "sigs.k8s.io/controller-runtime/pkg/log"
        "sigs.k8s.io/controller-runtime/pkg/log/zap"
        "sigs.k8s.io/controller-runtime/pkg/manager"
        "sigs.k8s.io/controller-runtime/pkg/manager/signals"
        "sigs.k8s.io/controller-runtime/pkg/webhook"
)

var (
        scheme = runtime.NewScheme()
        log    = logf.Log.WithName("pod-admission-webhook")
)

func init() {
        logf.SetLogger(zap.New())
}

func main() {
        entryLog := log.WithName("entrypoint")

        var (
                metricsAddr, certDir string
                port                 int
        )

        pflag.IntVar(&port, "port", 9443, "pod-admission-webhook listen port.")
        pflag.StringVar(&metricsAddr, "metrics-addr", ":8080", "The address the metric endpoint binds to.")
        pflag.StringVar(&certDir, "cert-dir", "", "CertDir is the directory that contains the server key and certificate. "+
                "if not set, webhook server would look up the server key and certificate in "+
                "{TempDir}/k8s-webhook-server/serving-certs. The server key and certificate "+
                "must be named tls.key and tls.crt, respectively.")
        pflag.CommandLine.AddGoFlagSet(flag.CommandLine)
        pflag.Parse()

        // Setup a Manager
        entryLog.Info("setting up manager")
        mgr, err := manager.New(config.GetConfigOrDie(), manager.Options{
                Scheme:             scheme,
                MetricsBindAddress: metricsAddr,
                Port:               port,
                CertDir:            certDir,
        })
        if err != nil {
                entryLog.Error(err, "unable to start manager")
                os.Exit(1)
        }

        // Setup webhooks
        entryLog.Info("setting up webhook server")
        hookServer := mgr.GetWebhookServer()

        entryLog.Info("registering webhooks to the webhook server")
        hookServer.Register("/mutate-pod", &webhook.Admission{Handler: &podMutate{Client: mgr.GetClient()}})

        entryLog.Info("starting manager")
        if err := mgr.Start(signals.SetupSignalHandler()); err != nil {
                entryLog.Error(err, "problem running manager")
                os.Exit(1)
        }
}
构建 podMutate 函数,注入 DNS 配置:
package main

import (
        "context"
        "encoding/json"
        "net/http"

        corev1 "k8s.io/api/core/v1"
        "sigs.k8s.io/controller-runtime/pkg/client"
        "sigs.k8s.io/controller-runtime/pkg/webhook/admission"
)

type podMutate struct {
        Client  client.Client
        decoder *admission.Decoder
}

func (p *podMutate) Handle(ctx context.Context, req admission.Request) admission.Response {
        pod := &corev1.Pod{}
        podMutateLog := log.WithName("podMutate")

        err := p.decoder.Decode(req, pod)
        if err != nil {
                podMutateLog.Error(err, "failed decoder pod")
                return admission.Errored(http.StatusBadRequest, err)
        }

        podDNSConfig := []corev1.PodDNSConfigOption{}
        ndotsValue := "2"
        ndotsOpt := corev1.PodDNSConfigOption{
                Name:  "ndots",
                Value: &ndotsValue,
        }
        podDNSConfig = append(podDNSConfig, ndotsOpt)
        timeoutValue := "1"
        timeoutOpt := corev1.PodDNSConfigOption{
                Name:  "timeout",
                Value: &timeoutValue,
        }
        podDNSConfig = append(podDNSConfig, timeoutOpt)
        reopenOpt := corev1.PodDNSConfigOption{
                Name: "single-request-reopen",
        }
        podDNSConfig = append(podDNSConfig, reopenOpt)

        if pod.Spec.DNSConfig == nil {
                pod.Spec.DNSConfig = &corev1.PodDNSConfig{
                        Options: podDNSConfig,
                }
        } else {
                if len(pod.Spec.DNSConfig.Options) == 0 {
                        pod.Spec.DNSConfig.Options = podDNSConfig
                }
        }

        marshaledPod, err := json.Marshal(pod)
        if err != nil {
                podMutateLog.Error(err, "failed marshal pod")
                return admission.Errored(http.StatusInternalServerError, err)
        }

        return admission.PatchResponseFromRaw(req.Object.Raw, marshaledPod)
}

// podMutate implements admission.DecoderInjector.
// A decoder will be automatically injected.

// InjectDecoder injects the decoder.
func (p *podMutate) InjectDecoder(d *admission.Decoder) error {
        p.decoder = d
        return nil
}
通过以上代码,一个简单 mutating webhook 服务就完成了。
4. TLS 认证
代码逻辑完成只是第一步,前面提到 API Server 和 webhook server 通信是基于 TLS 的,下面我们介绍如果配置 TLS。
创建 csr.conf 文件:
[ req ]
default_bits = 2048
prompt = no
default_md = sha256
req_extensions = req_ext
distinguished_name = dn

[ dn ]
C = CN
ST = Zhejiang
L = Hangzhou
O = opskumu
OU = opskumu
CN = pod-admission-webhook.kube-system

[ req_ext ]
subjectAltName = @alt_names

[ alt_names ]
DNS.1 = pod-admission-webhook
DNS.2 = pod-admission-webhook.kube-system
DNS.3 = pod-admission-webhook.kube-system.svc

[ v3_ext ]
authorityKeyIdentifier=keyid,issuer:always
basicConstraints=CA:FALSE
keyUsage=keyEncipherment,dataEncipherment
extendedKeyUsage=serverAuth,clientAuth
subjectAltName=@alt_names
通过以下命令生成证书,证书有效期根据实际情况修改,这里使用 10000 天:
openssl genrsa -out ca.key 2048
openssl req -x509 -new -nodes -key ca.key -subj "/CN=pod-admission-webhook.kube-system.svc" -days 10000 -out ca.crt
openssl genrsa -out tls.key 2048
openssl req -new -key tls.key -out tls.csr -config csr.conf
openssl x509 -req -in tls.csr -CA ca.crt -CAkey ca.key -CAcreateserial -out tls.crt -days 10000 -extensions v3_ext -extfile csr.conf
注意证书生成的 CN 字段,组成格式为 <serviceName>.<namespace>.svc 组成,示例服务名为 pod-admission-webhook,部署在 kube-system 空间。
5. 服务部署
- mutatingwebhook.yaml
证书生成之后,创建 Kubernetes 部署文件:
apiVersion: admissionregistration.k8s.io/v1
kind: MutatingWebhookConfiguration
metadata:
  name: pod-admission-webhook
webhooks:
- name: pod-admission-webhook.kube-system.svc
  clientConfig:
    caBundle: <ca base64>
    service:
      name: pod-admission-webhook
      namespace: kube-system
      path: "/mutate-pod"
  rules:
  - operations: ["CREATE"]
    apiGroups: [""]
    apiVersions: ["v1"]
    resources: ["pods"]
  failurePolicy: Fail
  namespaceSelector:
    matchLabels:
      pod-admission-webhook-injection: enabled
  sideEffects: None
  admissionReviewVersions: ["v1", "v1beta1"]
注意以上通过 namespaceSelector 来决定是否执行 webhook。如果要开启,则需要添加对应 labels,如:
kubectl label ns <namespace> pod-admission-webhook-injection=enabled
- secret.yaml
kubectl create secret tls pod-admission-webhook --dry-run=client --cert=tls.crt --key=tls.key --namespace kube-system -o yaml > secret.yaml
- service.yaml
apiVersion: v1
kind: Service
metadata:
  labels:
    app: pod-admission-webhook
  name: pod-admission-webhook
  namespace: pod-admission-webhook
spec:
  ports:
  - name: 443-9443
    port: 443
    protocol: TCP
    targetPort: 9443
  selector:
    app: pod-admission-webhook
  type: ClusterIP
- deployment.yaml
apiVersion: apps/v1
kind: Deployment
metadata:
  name: pod-admission-webhook
  namespace: kube-system
  labels:
    app: pod-admission-webhook
spec:
  replicas: 1
  selector:
    matchLabels:
      app: pod-admission-webhook
  template:
    metadata:
      labels:
        app: pod-admission-webhook
    spec:
      containers:
        - name: pod-admission-webhook
          image: <image>
          command:
            - "/pod-admission-webhook"
          args:
            - "--cert-dir"
            - "/certs"
          imagePullPolicy: IfNotPresent
          volumeMounts:
            - name: webhook-certs
              mountPath: /certs
              readOnly: true
          readinessProbe:
            failureThreshold: 3
            initialDelaySeconds: 10
            periodSeconds: 5
            successThreshold: 1
            tcpSocket:
              port: 8080
            timeoutSeconds: 1
          resources:
            limits:
              cpu: "1"
              memory: 1Gi
            requests:
              cpu: 125m
              memory: 500Mi
      volumes:
      - name: webhook-certs
        secret:
          secretName: pod-admission-webhook
根据实际情况修改相应的字段,如镜像、空间、命名等等,通过 kubectl 部署以上服务。
至此,一个简单的自定义 admission webhook 流程全部完成,完整代码见 admission-webhook-example